Docker仓库之分布式 Harbor
Harbor 介绍和架构
Harbor 介绍
Harbor是一个用于存储和分发Docker镜像的企业级Registry服务器,由vmware开源,其通过添加一些企业必需的功能特性,例如安全、标识和管理等,扩展了开源Docker Distribution。作为一个企业级私有Registry服务器,Harbor提供了更好的性能和安全。提升用户使用Registry构建和运行环境传输镜像的效率。Harbor支持安装在多个Registry节点的镜像资源复制,镜像全部保存在私有Registry中, 确保数据和知识产权在公司内部网络中管控,另外,Harbor也提供了高级的安全特性,诸如用户管理,访问控制和活动审计等
vmware官方开源服务:https://vmware.github.io/
harbor 官方github 地址:https://github.com/vmware/harbor
harbor 官方网址:https://goharbor.io/
harbor官方文档:https://goharbor.io/docs/
Harbor功能官方介绍
-基于角色的访问控制:用户与Docker镜像仓库通过“项目”进行组织管理,一个用户可以对多个镜像仓库在同一命名空间(project)里有不同的权限
-镜像复制:镜像可在多个Registry实例中复制(同步)。尤其适合于负载均衡,高可用,混合云和多云的场景
-图形化用户界面:用户可以通过浏览器来浏览,检索当前Docker镜像仓库,管理项目和命名空间
-AD/LDAP 支:Harbor可以集成企业内部已有的AD/LDAP,用于鉴权认证管理
-审计管理:所有针对镜像仓库的操作都可以被记录追溯,用于审计管理
-国际化:已拥有英文、中文、德文、日文和俄文的本地化版本。更多的语言将会添加进来
-RESTful API:提供给管理员对于Harbor更多的操控, 使得与其它管理软件集成变得更容易
-部署简单:提供在线和离线两种安装工具, 也可以安装到vSphere平台(OVA方式)虚拟设备
Harbor 组成
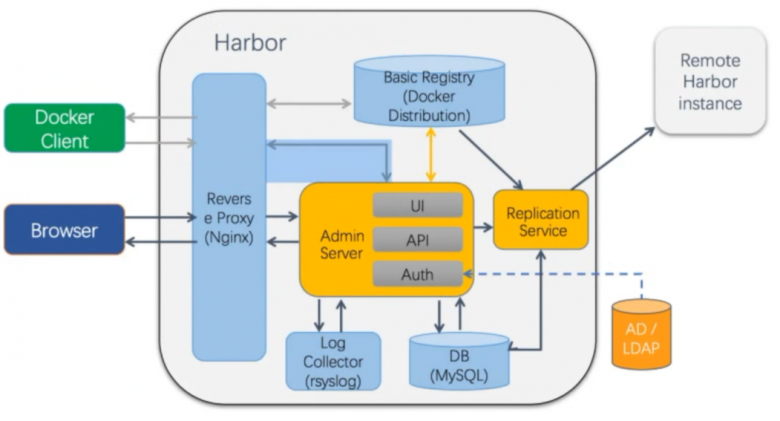
#harbor是由很多容器组成实现完整功能
[root@ubuntu1804 ~]#docker ps -a
CONTAINER ID        IMAGE                                    COMMAND                  CREATED              STATUS                        PORTS                                                              NAMES
4ec3c3885407        goharbor/nginx-photon:v1.7.6             "nginx -g 'daemon of…"   About a minute ago   Up About a minute (healthy)   0.0.0.0:80->80/tcp, 0.0.0.0:443->443/tcp, 0.0.0.0:4443->4443/tcp   nginx
5707b4ac41d8        goharbor/harbor-portal:v1.7.6            "nginx -g 'daemon of…"   About a minute ago   Up About a minute (healthy)   80/tcp                                                             harbor-portal
0ed230b9b714        goharbor/harbor-jobservice:v1.7.6        "/harbor/start.sh"       About a minute ago   Up About a minute                                                                                harbor-jobservice
fec659188349        goharbor/harbor-core:v1.7.6              "/harbor/start.sh"       About a minute ago   Up About a minute (healthy)                                                                      harbor-core
910d14c1d7f7        goharbor/harbor-adminserver:v1.7.6       "/harbor/start.sh"       2 minutes ago        Up About a minute (healthy)                                                                      harbor-adminserver
4348f503aa0e        goharbor/harbor-db:v1.7.6                "/entrypoint.sh post…"   2 minutes ago        Up About a minute (healthy)   5432/tcp                                                           harbor-db
beff6886f0f1        goharbor/harbor-registryctl:v1.7.6       "/harbor/start.sh"       2 minutes ago        Up About a minute (healthy)                                                                      registryctl
428c99d274bf        goharbor/registry-photon:v2.6.2-v1.7.6   "/entrypoint.sh /etc…"   2 minutes ago        Up About a minute (healthy)   5000/tcp                                                           registry
775b4026fa4e        goharbor/redis-photon:v1.7.6             "docker-entrypoint.s…"   2 minutes ago        Up About a minute             6379/tcp                                                           redis
c6f44e2034c6 goharbor/harbor-log:v1.7.6 "/bin/sh -c /usr/loc…" 2 minutes ago Up 2 minutes (healthy)- Proxy:对应启动组件nginx。它是一个nginx反向代理,代理Notary client(镜像认证)、Docker client(镜像上传下载等)和浏览器的访问请求(Core Service)给后端的各服务
- UI(Core Service):对应启动组件harbor-ui。底层数据存储使用mysql数据库,主要提供了四个子功能:
- UI:一个web管理页面ui
- API:Harbor暴露的API服务
- Auth:用户认证服务,decode后的token中的用户信息在这里进行认证;auth后端可以接db、ldap、uaa三种认证实现
- Token服务(上图中未体现):负责根据用户在每个project中的role来为每一个docker push/pull命令issuing一个token,如果从docker client发送给registry的请求没有带token,registry会重定向请求到token服务创建token
- Registry:对应启动组件registry。负责存储镜像文件,和处理镜像的pull/push命令。Harbor对镜像进行强制的访问控制,Registry会将客户端的每个pull、push请求转发到token服务来获取有效的token
- Admin Service:对应启动组件harbor-adminserver。是系统的配置管理中心附带检查存储用量,ui和jobserver启动时候需要加载adminserver的配置
- Job Sevice:对应启动组件harbor-jobservice。负责镜像复制工作的,他和registry通信,从一个registry pull镜像然后push到另一个registry,并记录job_log
- Log Collector:对应启动组件harbor-log。日志汇总组件,通过docker的log-driver把日志汇总到一起
- DB:对应启动组件harbor-db,负责存储project、 user、 role、replication、image_scan、access等的metadata数据
安装Harbor
下载地址:https://github.com/vmware/harbor/releases
安装文档:https://github.com/vmware/harbor/blob/master/docs/installation_guide.md
环境准备:共四台主机
- 两台主机当harbor,地址:10.0.0.101|102
- 另两台主机上传和下载镜像
安装docker
[root@ubuntu1804 ~]#cat install_docker_for_ubuntu1804.sh
COLOR="echo -e \\033[1;31m"
END="\033[m"
DOCKER_VERSION="5:19.03.5~3-0~ubuntu-bionic"

install_docker(){
apt update
apt  -y install apt-transport-https ca-certificates curl software-properties-common
curl -fsSL https://mirrors.aliyun.com/docker-ce/linux/ubuntu/gpg | sudo apt-key add -
add-apt-repository "deb [arch=amd64] https://mirrors.aliyun.com/docker-ce/linux/ubuntu $(lsb_release -cs) stable"
apt update
${COLOR}"Docker有以下版本"${END}
apt-cache madison docker-ce
${COLOR}"5秒后即将安装: docker-"${DOCKER_VERSION}" 版本....."${END}
${COLOR}"如果想安装其它Docker版本,请按ctrl+c键退出,修改版本再执行"${END}
sleep 5

apt -y  install docker-ce=${DOCKER_VERSION} docker-ce-cli=${DOCKER_VERSION}

mkdir -p /etc/docker
tee /etc/docker/daemon.json <<-'EOF'
{
      "registry-mirrors": ["https://si7y70hh.mirror.aliyuncs.com"]
}
EOF
systemctl daemon-reload
systemctl restart docker
docker version && ${COLOR}"Docker 安装成功"${END} ||  ${COLOR}"Docker 安装失败"${END}
}
dpkg -s docker-ce &> /dev/null && ${COLOR}"Docker已安装"${END} || install_docker

[root@ubuntu1804 ~]#bash install_docker_for_ubuntu1804.sh
[root@ubuntu1804 ~]#docker version
Client: Docker Engine - Community
 Version:           19.03.5
 API version:       1.40
 Go version:        go1.12.12
 Git commit:        633a0ea838
 Built:             Wed Nov 13 07:29:52 2019
 OS/Arch:           linux/amd64
 Experimental:      false

Server: Docker Engine - Community
 Engine:
  Version:          19.03.5
  API version:      1.40 (minimum version 1.12)
  Go version:       go1.12.12
  Git commit:       633a0ea838
  Built:            Wed Nov 13 07:28:22 2019
  OS/Arch:          linux/amd64
  Experimental:     false
 containerd:
  Version:          1.2.10
  GitCommit:        b34a5c8af56e510852c35414db4c1f4fa6172339
 runc:
  Version:          1.0.0-rc8+dev
  GitCommit:        3e425f80a8c931f88e6d94a8c831b9d5aa481657
 docker-init:
  Version:          0.18.0
  GitCommit:        fec3683
下载Harbor安装包并解压缩
以下使用 harbor 稳定版本1.7.6安装包
方法1:下载离线完整安装包,推荐使用
[root@ubuntu1804 ~]#wget https://storage.googleapis.com/harbor-releases/release-1.7.0/harbor-offline-installer-v1.7.6.tgz方法2:下载在线安装包 ,不是很推荐
[root@ubuntu1804 ~]#wget https://storage.googleapis.com/harbor-releases/release-1.7.0/harbor-online-installer-v1.7.6.tgz[root@ubuntu1804 ~]#ls -lh harbor-o*
-rw-r--r-- 1 root root 568M Sep 18 13:24 harbor-offline-installer-v1.7.6.tgz
-rw-r--r-- 1 root root 275K Sep 18 13:37 harbor-online-installer-v1.7.6.tgz解压缩
[root@ubuntu1804 ~]#mkdir /apps
[root@ubuntu1804 ~]#tar xvf harbor-offline-installer-v1.7.6.tgz  -C /apps/
编辑配置文件 harbor.cfg
[root@ubuntu1804 ~]#vim /apps/harbor/harbor.cfg
#只需要修改下面两行
hostname = 10.0.0.101  #指向当前主机IP
harbor_admin_password = 123456 #指定harbor登录用户admin的密码
先安装docker compose
#docker compose 必须先于harbor安装,否则会报以下错误
[root@ubuntu1804 ~]#/apps/harbor/install.sh

[Step 0]: checking installation environment ...

Note: docker version: 19.03.5
✖ Need to install docker-compose(1.7.1+) by yourself first and run this script again
[root@ubuntu1804 ~]#
安装docker compose
#方法1:通过pip安装,版本较新docker_compose-1.25.3,推荐使用
[root@ubuntu1804 ~]#apt -y install python-pip
[root@ubuntu1804 ~]#pip install docker-compose
[root@ubuntu1804 ~]#docker-compose --version
docker-compose version 1.25.3, build unknown

#方法2:直接从github下载安装对应版本
#参看说明:https://github.com/docker/compose/releases
curl -L https://github.com/docker/compose/releases/download/1.25.3/docker-compose-uname -s-uname -m -o /usr/local/bin/docker-compose
chmod +x /usr/local/bin/docker-compose

#方法3:直接安装,版本较旧docker-compose-1.17.1-2,不推荐使用
[root@ubuntu1804 ~]#apt -y install docker-compose
[root@ubuntu1804 ~]#docker-compose --version
docker-compose version 1.17.1, build unknown
运行安装脚本安装harbor
#再次安装docker harbor
root@ubuntu1804 ~]#/apps/harbor/install.sh

[Step 0]: checking installation environment ...

Note: docker version: 19.03.5

Note: docker-compose version: 1.25.3

[Step 1]: loading Harbor images ...
......
[Step 4]: starting Harbor ...
Creating network "harbor_harbor" with the default driver
Creating harbor-log ... done
Creating registryctl        ... done
Creating harbor-db          ... done
Creating redis              ... done
Creating registry           ... done
Creating harbor-adminserver ... done
Creating harbor-core        ... done
Creating harbor-jobservice  ... done
Creating harbor-portal      ... done
Creating nginx              ... done

✔ ----Harbor has been installed and started successfully.----

Now you should be able to visit the admin portal at http://10.0.0.101.
For more details, please visit https://github.com/goharbor/harbor .

#安装harbor后会自动开启很多相关容器
[root@ubuntu1804 ~]#docker ps
CONTAINER ID        IMAGE                                    COMMAND                  CREATED             STATUS                    PORTS                                                              NAMES
1b47a3eeedd2        goharbor/nginx-photon:v1.7.6             "nginx -g 'daemon of…"   14 minutes ago      Up 14 minutes (healthy)   0.0.0.0:80->80/tcp, 0.0.0.0:443->443/tcp, 0.0.0.0:4443->4443/tcp   nginx
5f3a0a0db734        goharbor/harbor-portal:v1.7.6            "nginx -g 'daemon of…"   14 minutes ago      Up 14 minutes (healthy)   80/tcp                                                             harbor-portal
8e4265efe8ee        goharbor/harbor-jobservice:v1.7.6        "/harbor/start.sh"       14 minutes ago      Up 14 minutes                                                                                harbor-jobservice
d1a048525d79        goharbor/harbor-core:v1.7.6              "/harbor/start.sh"       14 minutes ago      Up 14 minutes (healthy)                                                                      harbor-core
4a989eb92af1        goharbor/harbor-adminserver:v1.7.6       "/harbor/start.sh"       14 minutes ago      Up 14 minutes (healthy)                                                                      harbor-adminserver
c875d3959c56        goharbor/registry-photon:v2.6.2-v1.7.6   "/entrypoint.sh /etc…"   14 minutes ago      Up 14 minutes (healthy)   5000/tcp                                                           registry
2a963125a0e6        goharbor/redis-photon:v1.7.6             "docker-entrypoint.s…"   14 minutes ago      Up 14 minutes             6379/tcp                                                           redis
a0751df44d68        goharbor/harbor-registryctl:v1.7.6       "/harbor/start.sh"       14 minutes ago      Up 14 minutes (healthy)                                                                      registryctl
b0ef6ed0d46b        goharbor/harbor-db:v1.7.6                "/entrypoint.sh post…"   14 minutes ago      Up 14 minutes (healthy)   5432/tcp                                                           harbor-db
8e667c6ccbc1        goharbor/harbor-log:v1.7.6               "/bin/sh -c /usr/loc…"   14 minutes ago      Up 14 minutes (healthy)   127.0.0.1:1514->10514/tcp                                          harbor-log
[root@ubuntu1804 ~]#
登录harbor主机网站
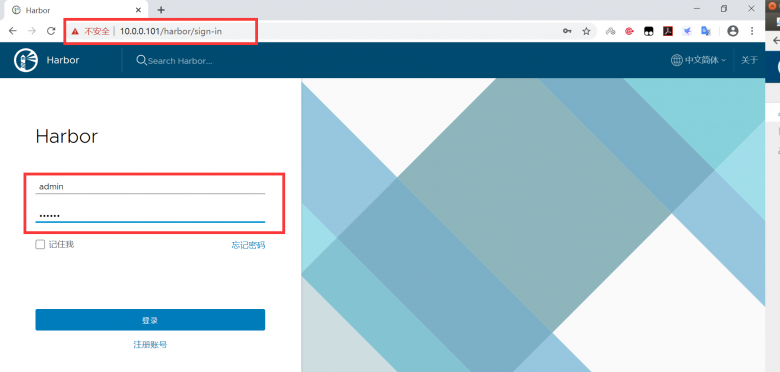
用浏览器访问:http://10.0.0.101/
用户名:admin
密码:即前面harbor.cfg中指定的密码

实战案例:一键安装Harbor脚本
[root@ubuntu1804 ~]#cat install_harbor_for_ubuntu1804.sh
#!/bin/bash
#Description: Install harbor on ubuntu1804
#Author: laowang

COLOR="echo -e \\033[1;31m"
END="\033[m"
DOCKER_VERSION="5:19.03.5~3-0~ubuntu-bionic"
HARBOR_VERSION=1.7.6
IPADDR=hostname -I|awk '{print $1}'
HARBOR_ADMIN_PASSWORD=123456

install_docker(){
${COLOR}"开始安装 Docker....."${END}
sleep 1

apt update
apt  -y install apt-transport-https ca-certificates curl software-properties-common
curl -fsSL https://mirrors.aliyun.com/docker-ce/linux/ubuntu/gpg | sudo apt-key add -
add-apt-repository "deb [arch=amd64] https://mirrors.aliyun.com/docker-ce/linux/ubuntu $(lsb_release -cs) stable"
apt update

${COLOR}"Docker有以下版本:"${END}
sleep 2
apt-cache madison docker-ce
${COLOR}"5秒后即将安装: docker-"${DOCKER_VERSION}" 版本....."${END}
${COLOR}"如果想安装其它Docker版本,请按ctrl+c键退出,修改版本再执行"${END}
sleep 5

apt -y  install docker-ce=${DOCKER_VERSION} docker-ce-cli=${DOCKER_VERSION}

mkdir -p /etc/docker
tee /etc/docker/daemon.json <<-'EOF'
{
      "registry-mirrors": ["https://si7y70hh.mirror.aliyuncs.com"]
}
EOF
systemctl daemon-reload
systemctl restart docker
docker version && ${COLOR}"Docker 安装完成"${END} ||  ${COLOR}"Docker 安装失败"${END}
}

install_docker_compose(){
${COLOR}"开始安装 Docker compose....."${END}
sleep 1

curl -L https://github.com/docker/compose/releases/download/1.25.3/docker-compose-uname -s-uname -m -o /usr/local/bin/docker-compose
chmod +x /usr/local/bin/docker-compose

docker-compose --version &&  ${COLOR}"Docker Compose 安装完成"${END} ||  ${COLOR}"Docker compose 安装失败"${END}
}

install_harbor(){
${COLOR}"开始安装 Harbor....."${END}
sleep 1

wget https://storage.googleapis.com/harbor-releases/release-1.7.0/harbor-offline-installer-v${HARBOR_VERSION}.tgz
mkdir /apps
tar xvf harbor-offline-installer-v${HARBOR_VERSION}.tgz  -C /apps/

sed -i.bak -e 's/^hostname =.*/hostname = '''$IPADDR'''/' -e 's/^harbor_admin_password =.*/harbor_admin_password = '''$HARBOR_ADMIN_PASSWORD'''/' /apps/harbor/harbor.cfg

apt -y install python

/apps/harbor/install.sh && ${COLOR}"Harbor 安装完成"${END} ||  ${COLOR}"Harbor 安装失败"${END}

}

dpkg -s docker-ce &> /dev/null && ${COLOR}"Docker已安装"${END} || install_docker

docker-compose --version &> /dev/null && ${COLOR}"Docker Compose已安装"${END} || install_docker_compose

install_harbor

[root@ubuntu1804 ~]#
使用harbor
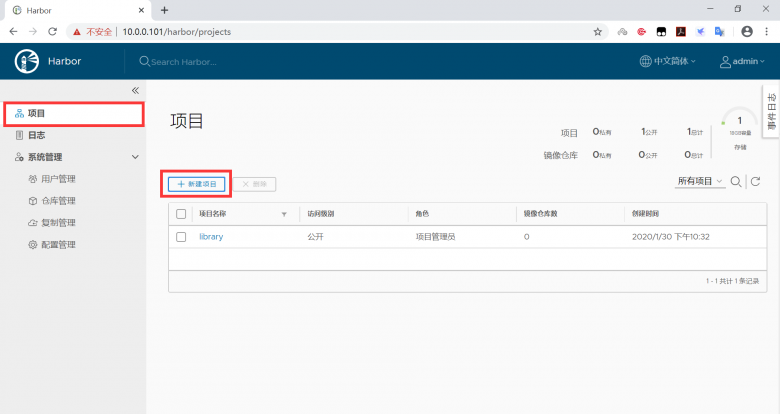
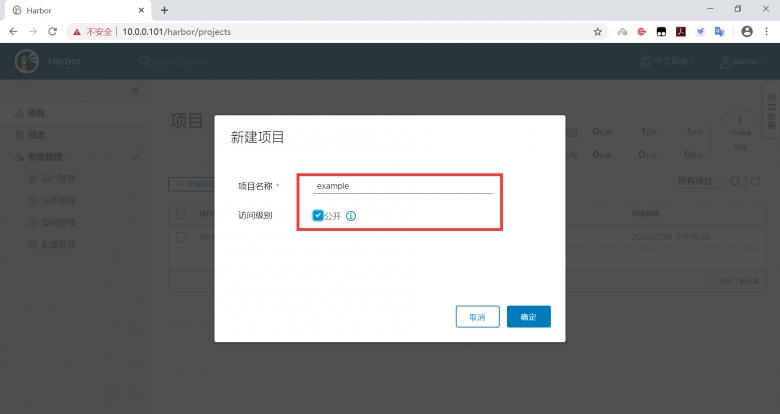
建立项目
harbor上必须先建立项目,才能上传镜像
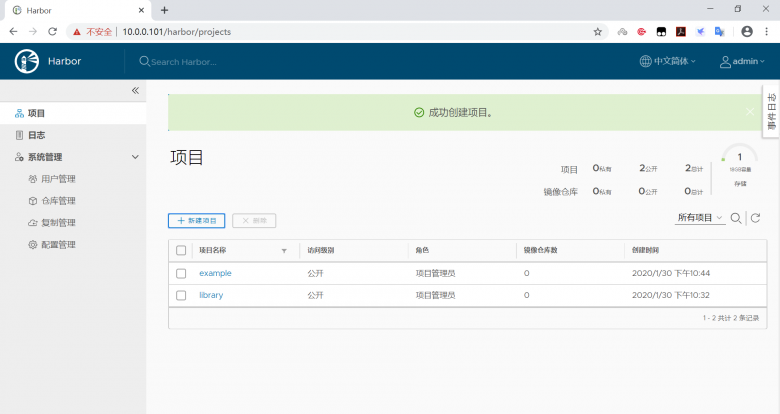
命令行登录harbor
[root@ubuntu1804 ~]#vim /lib/systemd/system/docker.service
ExecStart=/usr/bin/dockerd -H fd:// --containerd=/run/containerd/containerd.sock  --insecure-registry 10.0.0.101 --insecure-registry 10.0.0.102

[root@ubuntu1804 ~]#systemctl daemon-reload
[root@ubuntu1804 ~]#systemctl restart docker
[root@ubuntu1804 ~]#docker login 10.0.0.101
Username: admin
Password:
WARNING! Your password will be stored unencrypted in /root/.docker/config.json.
Configure a credential helper to remove this warning. See
https://docs.docker.com/engine/reference/commandline/login/#credentials-store

Login Succeeded

#查看进程是否添加上面设置
[root@ubuntu1804 ~]#ps aux|grep dockerd
root      17347  7.8  9.6 839272 94784 ?        Ssl  22:54   0:15 /usr/bin/dockerd -H fd:// --containerd=/run/containerd/containerd.sock --insecure-registry 10.0.0.101 --insecure-registry 10.0.0.102
root      17630  0.0  0.1  14428  1008 pts/4    S+   22:57   0:00 grep --color=auto dockerd

[root@ubuntu1804 ~]#cat .docker/config.json
{
    "auths": {
        "10.0.0.101": {
            "auth": "YWRtaW46MTIzNDU2"
        },
        "https://index.docker.io/v1/": {
            "auth": "d2FuZ3hpYW9jaHVuOmxidG9vdGgwNjE4"
        },
        "registry.cn-beijing.aliyuncs.com": {
            "auth": "MjkzMDg2MjBAcXEuY29tOmxidG9vdGgwNjE4"
        }
    },
    "HttpHeaders": {
        "User-Agent": "Docker-Client/19.03.5 (linux)"
    }
}
给本地镜像打标签并上传到harbor
修改 images 的名称,不修改成指定格式无法将镜像上传到 harbor 仓库
格式为:
Harbor主机IP/项目名/image名字:版本范例:
#上传镜像前,必须先登录harbor
[root@ubuntu1804 ~]#docker login 10.0.0.101
Username: admin
Password:
WARNING! Your password will be stored unencrypted in /root/.docker/config.json.
Configure a credential helper to remove this warning. See
https://docs.docker.com/engine/reference/commandline/login/#credentials-store

Login Succeeded
[root@ubuntu1804 ~]#docker tag alpine-base:3.11 10.0.0.101/example/alpine-base:3.11
[root@ubuntu1804 ~]#docker push 10.0.0.101/example/alpine-base:3.11
访问harbor网站验证上传镜像成功
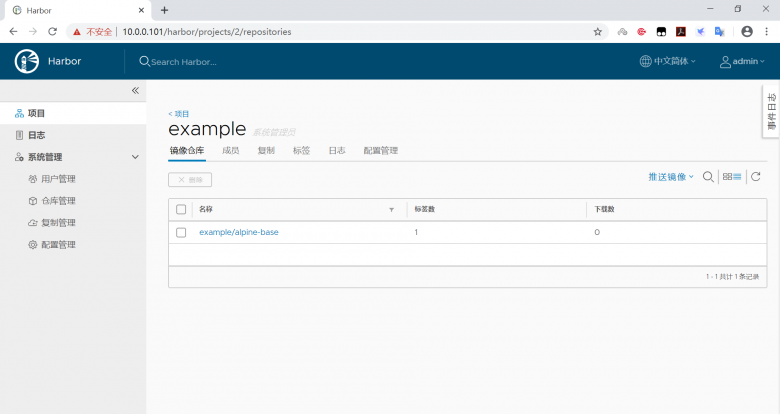
范例:不事先建立项目,上传镜像失败
[root@ubuntu1804 ~]#docker tag centos7-base:v1 10.0.0.101/example2/centos7-base:v1
[root@ubuntu1804 ~]#docker push 10.0.0.101/example2/centos7-base:v1
The push refers to repository [10.0.0.101/example2/centos7-base]
2073413aebd6: Preparing
6ec9af97c369: Preparing
034f282942cd: Preparing
denied: requested access to the resource is denied
[root@ubuntu1804 ~]#docker tag centos7-base:v1 10.0.0.101/example/centos7-base:v1
[root@ubuntu1804 ~]#docker push 10.0.0.101/example/centos7-base:v1
The push refers to repository [10.0.0.101/example/centos7-base]
2073413aebd6: Pushed
6ec9af97c369: Pushed
034f282942cd: Pushed
v1: digest: sha256:02cd943f2569c7c55f08a979fd9661f1fd7893c424bca7b343188654ba63d98d size: 949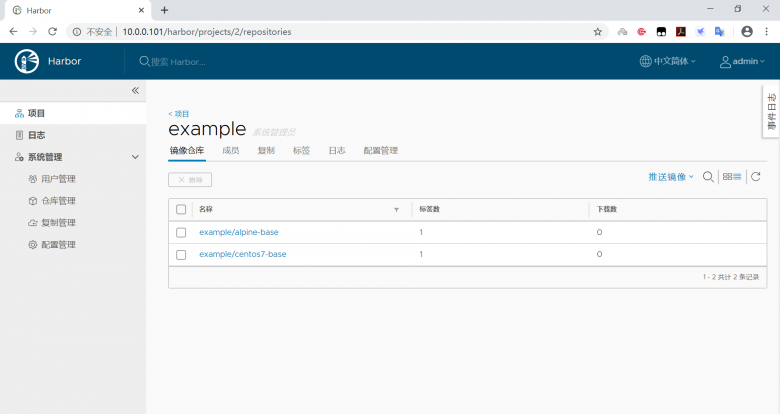
可以看到操作的日志记录
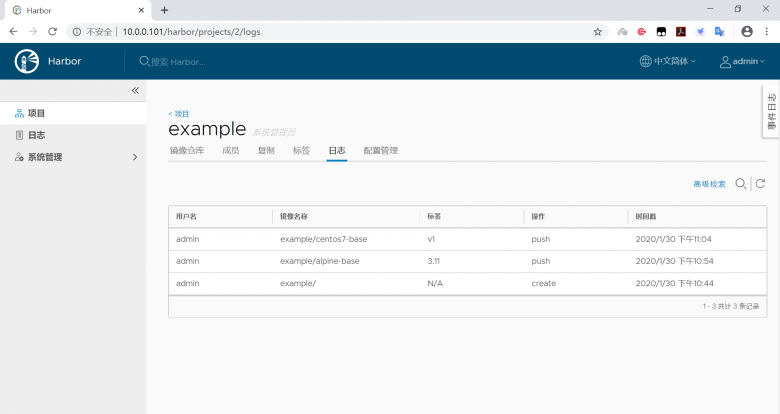 下载harbor的镜像
在10.0.0.103的CentOS 7 的主机上无需登录,即可下载镜像
下载前必须修改docker的service 文件,加入harbor服务器的地址才可以下载
范例:修改docker的service文件
[root@centos7 ~]#docker pull 10.0.0.101/example/centos7-base:v1
Error response from daemon: Get https://10.0.0.101/v2/: dial tcp 10.0.0.101:443: connect: connection refused
[root@ubuntu1804 ~]#vim /lib/systemd/system/docker.service
ExecStart=/usr/bin/dockerd -H fd:// --containerd=/run/containerd/containerd.sock  --insecure-registry 10.0.0.101 --insecure-registry 10.0.0.102
[root@centos7 ~]#systemctl daemon-reload
[root@centos7 ~]#systemctl restart docker
[root@centos7 ~]#docker images
REPOSITORY          TAG                 IMAGE ID            CREATED             SIZE
范例:从harbor下载镜像
[root@centos7 ~]#docker pull 10.0.0.101/example/centos7-base:v1
v1: Pulling from example/centos7-base
f34b00c7da20: Pull complete
544476d462f7: Pull complete
39345915aa1b: Pull complete
Digest: sha256:02cd943f2569c7c55f08a979fd9661f1fd7893c424bca7b343188654ba63d98d
Status: Downloaded newer image for 10.0.0.101/example/centos7-base:v1
10.0.0.101/example/centos7-base:v1
[root@centos7 ~]#docker images
REPOSITORY                        TAG                 IMAGE ID            CREATED             SIZE
10.0.0.101/example/centos7-base   v1                  34ab3afcd3b3        2 days ago          403MB
5.4.3.5 创建自动打标签上传镜像脚本
#在10.0.0.100上修改以前的build.sh脚本
[root@ubuntu1804 ~]#cd /data/dockerfile/web/nginx/1.16.1-alpine/
[root@ubuntu1804 1.16.1-alpine]#vim build.sh
[root@ubuntu1804 1.16.1-alpine]#cat build.sh
#!/bin/bash
TAG=$1
docker build -t 10.0.0.101/example/nginx-alpine:1.16.1-${TAG} .
docker push 10.0.0.101/example/nginx-alpine:1.16.1-${TAG}
docker rmi -f 10.0.0.101/example/nginx-alpine:1.16.1-${TAG}
[root@ubuntu1804 1.16.1-alpine]#bash build.sh v1
登录harbor网站验证脚本上传镜像成功
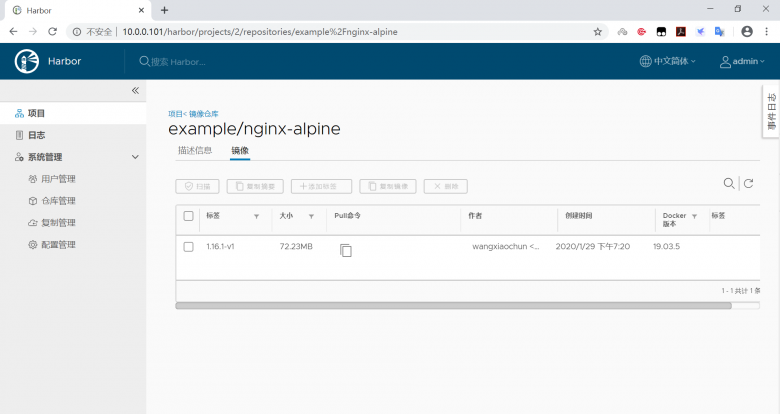
修改harbor配置
后期如果修改harbor配置,比如:修改IP地址等,可执行以下步骤生效
方法1:
[root@ubuntu1804 ~]#cd /apps/harbor/
[root@ubuntu1804 harbor]#docker-compose stop
Stopping nginx              ... done
Stopping harbor-portal      ... done
Stopping harbor-jobservice  ... done
Stopping harbor-core        ... done
Stopping harbor-adminserver ... done
Stopping harbor-db          ... done
Stopping registryctl        ... done
Stopping registry           ... done
Stopping redis              ... done
Stopping harbor-log         ...

#所有相关容器都退出
[root@ubuntu1804 harbor]#docker ps  -a
CONTAINER ID        IMAGE                                    COMMAND                  CREATED             STATUS                        PORTS               NAMES
4ec3c3885407        goharbor/nginx-photon:v1.7.6             "nginx -g 'daemon of…"   32 minutes ago      Exited (0) 51 seconds ago                         nginx
5707b4ac41d8        goharbor/harbor-portal:v1.7.6            "nginx -g 'daemon of…"   32 minutes ago      Exited (0) 50 seconds ago                         harbor-portal
0ed230b9b714        goharbor/harbor-jobservice:v1.7.6        "/harbor/start.sh"       32 minutes ago      Exited (137) 41 seconds ago                       harbor-jobservice
fec659188349        goharbor/harbor-core:v1.7.6              "/harbor/start.sh"       32 minutes ago      Exited (137) 30 seconds ago                       harbor-core
910d14c1d7f7        goharbor/harbor-adminserver:v1.7.6       "/harbor/start.sh"       32 minutes ago      Exited (137) 20 seconds ago                       harbor-adminserver
4348f503aa0e        goharbor/harbor-db:v1.7.6                "/entrypoint.sh post…"   32 minutes ago      Exited (255) 48 seconds ago                       harbor-db
beff6886f0f1        goharbor/harbor-registryctl:v1.7.6       "/harbor/start.sh"       32 minutes ago      Exited (137) 41 seconds ago                       registryctl
428c99d274bf        goharbor/registry-photon:v2.6.2-v1.7.6   "/entrypoint.sh /etc…"   32 minutes ago      Exited (137) 20 seconds ago                       registry
775b4026fa4e        goharbor/redis-photon:v1.7.6             "docker-entrypoint.s…"   32 minutes ago      Exited (137) 30 seconds ago                       redis
c6f44e2034c6        goharbor/harbor-log:v1.7.6               "/bin/sh -c /usr/loc…"   32 minutes ago      Exited (137) 9 seconds ago                        harbor-log

#修改harbor配置
[root@ubuntu1804 harbor]#vim harbor.cfg

#更新配置
[root@ubuntu1804 ~]#/apps/harbor/prepare
Clearing the configuration file: /apps/harbor/common/config/db/env
Clearing the configuration file: /apps/harbor/common/config/core/private_key.pem
Clearing the configuration file: /apps/harbor/common/config/core/env
Clearing the configuration file: /apps/harbor/common/config/core/app.conf
Clearing the configuration file: /apps/harbor/common/config/adminserver/env
Clearing the configuration file: /apps/harbor/common/config/registryctl/env
Clearing the configuration file: /apps/harbor/common/config/registryctl/config.yml
Clearing the configuration file: /apps/harbor/common/config/registry/root.crt
Clearing the configuration file: /apps/harbor/common/config/registry/config.yml
Clearing the configuration file: /apps/harbor/common/config/log/logrotate.conf
Clearing the configuration file: /apps/harbor/common/config/nginx/nginx.conf
Clearing the configuration file: /apps/harbor/common/config/jobservice/env
Clearing the configuration file: /apps/harbor/common/config/jobservice/config.yml
loaded secret from file: /data/secretkey
Generated configuration file: /apps/harbor/common/config/nginx/nginx.conf
Generated configuration file: /apps/harbor/common/config/adminserver/env
Generated configuration file: /apps/harbor/common/config/core/env
Generated configuration file: /apps/harbor/common/config/registry/config.yml
Generated configuration file: /apps/harbor/common/config/db/env
Generated configuration file: /apps/harbor/common/config/jobservice/env
Generated configuration file: /apps/harbor/common/config/jobservice/config.yml
Generated configuration file: /apps/harbor/common/config/log/logrotate.conf
Generated configuration file: /apps/harbor/common/config/registryctl/env
Generated configuration file: /apps/harbor/common/config/core/app.conf
Generated certificate, key file: /apps/harbor/common/config/core/private_key.pem, cert file: /apps/harbor/common/config/registry/root.crt
The configuration files are ready, please use docker-compose to start the service.

#重新启动docker compose
[root@ubuntu1804 harbor]#docker-compose  start
Starting log         ... done
Starting postgresql  ... done
Starting redis       ... done
Starting adminserver ... done
Starting registry    ... done
Starting core        ... done
Starting jobservice  ... done
Starting portal      ... done
Starting proxy       ... done
Starting registryctl ... done

#相关容器自动启动
[root@ubuntu1804 harbor]#docker ps
CONTAINER ID        IMAGE                                    COMMAND                  CREATED             STATUS                             PORTS                                                              NAMES
4ec3c3885407        goharbor/nginx-photon:v1.7.6             "nginx -g 'daemon of…"   34 minutes ago      Up 9 seconds (health: starting)    0.0.0.0:80->80/tcp, 0.0.0.0:443->443/tcp, 0.0.0.0:4443->4443/tcp   nginx
5707b4ac41d8        goharbor/harbor-portal:v1.7.6            "nginx -g 'daemon of…"   34 minutes ago      Up 9 seconds (health: starting)    80/tcp                                                             harbor-portal
0ed230b9b714        goharbor/harbor-jobservice:v1.7.6        "/harbor/start.sh"       34 minutes ago      Up 10 seconds                                                                                         harbor-jobservice
fec659188349        goharbor/harbor-core:v1.7.6              "/harbor/start.sh"       34 minutes ago      Up 11 seconds (health: starting)                                                                      harbor-core
910d14c1d7f7        goharbor/harbor-adminserver:v1.7.6       "/harbor/start.sh"       34 minutes ago      Up 14 seconds (health: starting)                                                                      harbor-adminserver
4348f503aa0e        goharbor/harbor-db:v1.7.6                "/entrypoint.sh post…"   34 minutes ago      Up 13 seconds (health: starting)   5432/tcp                                                           harbor-db
beff6886f0f1        goharbor/harbor-registryctl:v1.7.6       "/harbor/start.sh"       34 minutes ago      Up 12 seconds (health: starting)                                                                      registryctl
428c99d274bf        goharbor/registry-photon:v2.6.2-v1.7.6   "/entrypoint.sh /etc…"   34 minutes ago      Up 13 seconds (health: starting)   5000/tcp                                                           registry
775b4026fa4e        goharbor/redis-photon:v1.7.6             "docker-entrypoint.s…"   34 minutes ago      Up 11 seconds                      6379/tcp                                                           redis
c6f44e2034c6        goharbor/harbor-log:v1.7.6               "/bin/sh -c /usr/loc…"   34 minutes ago      Up 16 seconds (health: starting)   127.0.0.1:1514->10514/tcp                                          harbor-log
[root@ubuntu1804 harbor]#
方法2:
[root@ubuntu1804 ~]#/apps/harbor/install.sh实现harbor高可用
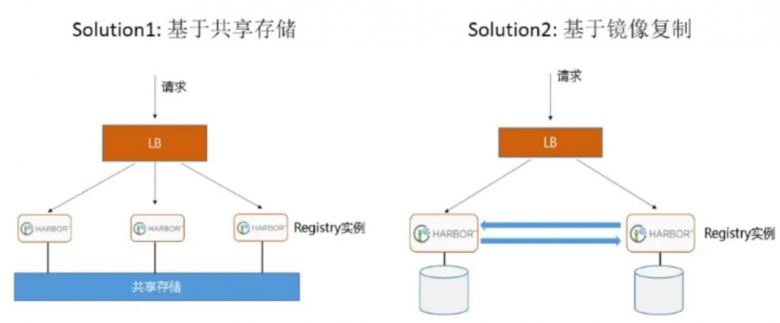
Harbor支持基于策略的Docker镜像复制功能,这类似于MySQL的主从同步,其可以实现不同的数据中心、不同的运行环境之间同步镜像,并提供友好的管理界面,大大简化了实际运维中的镜像管理工作,已经有用很多互联网公司使用harbor搭建内网docker仓库的案例,并且还有实现了双向复制功能
安装第二台harbor主机
参考5.4.2的过程,在第二台主机上安装部署好harbor,并登录系统
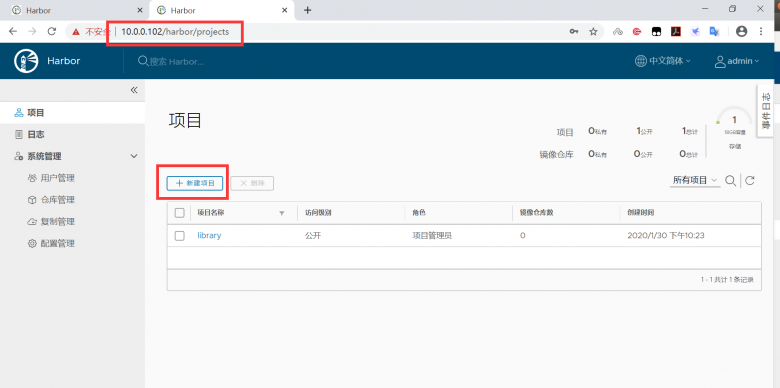
第二台harbor上新建项目
参考第一台harbor服务器的项目名称,在第二台harbor服务器上新建与之同名的项目
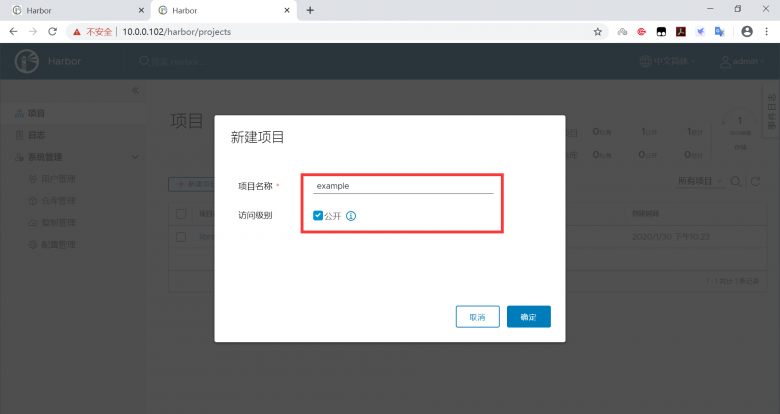
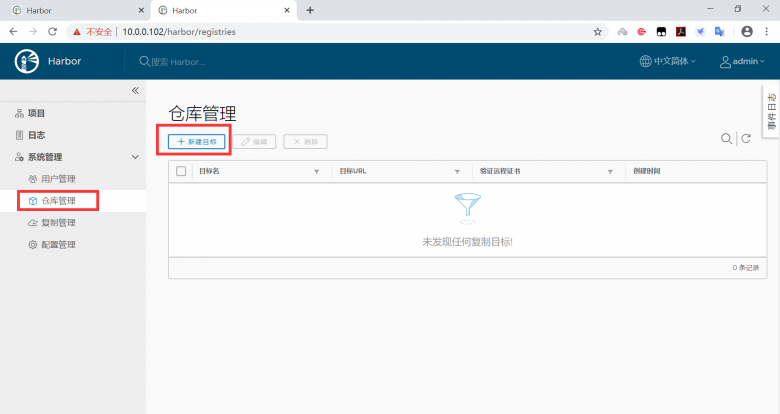
第二台harbor上仓库管理中新建目标
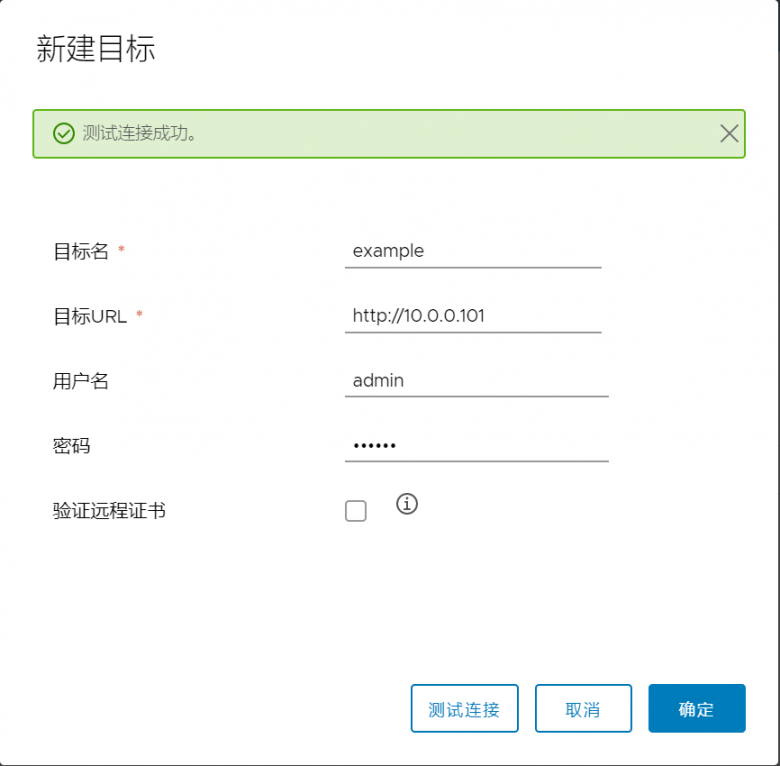
参考第一台主机新建复制(同步)目标信息
输入第一台harbor服务器上的用户信息
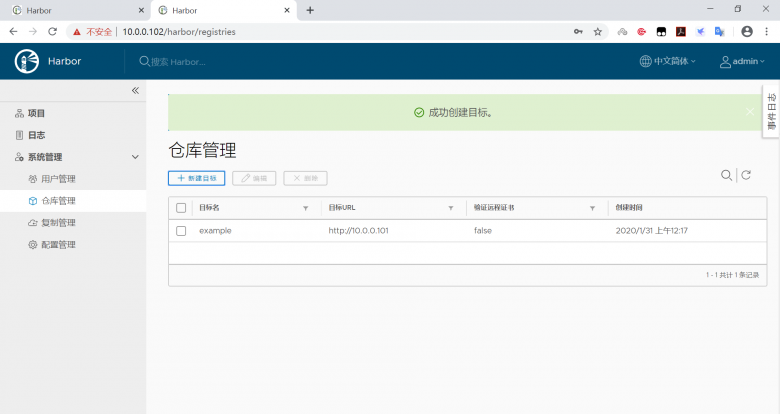
第二台harbor上新建复制规则
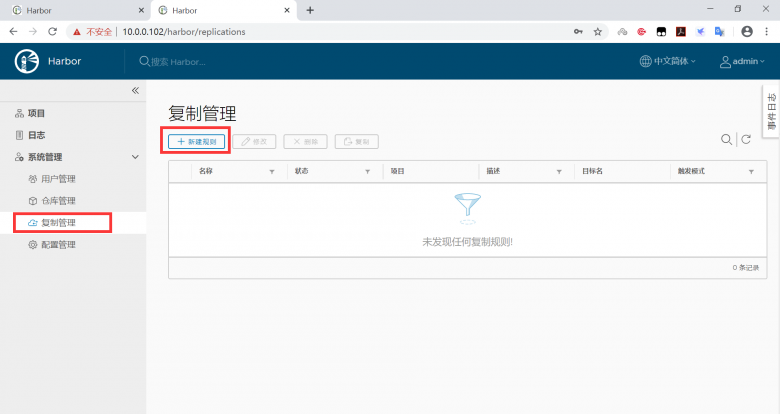
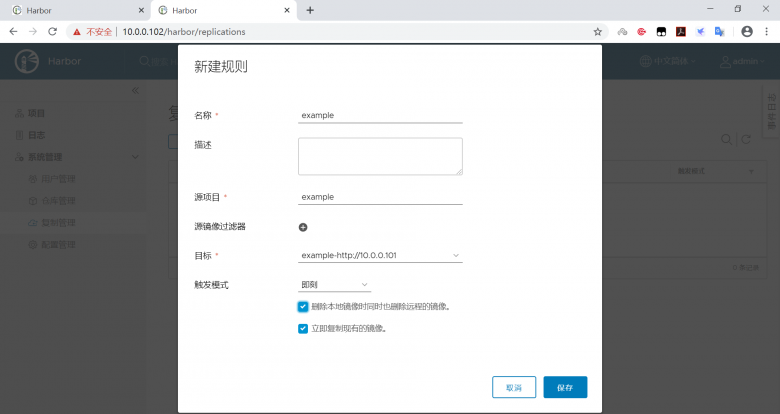
在第一台harbor主机上重复上面操作
以上操作,只是实现了从10.0.0.1到10.0.102的单向同步,再执行下面操作,才实现双向同步
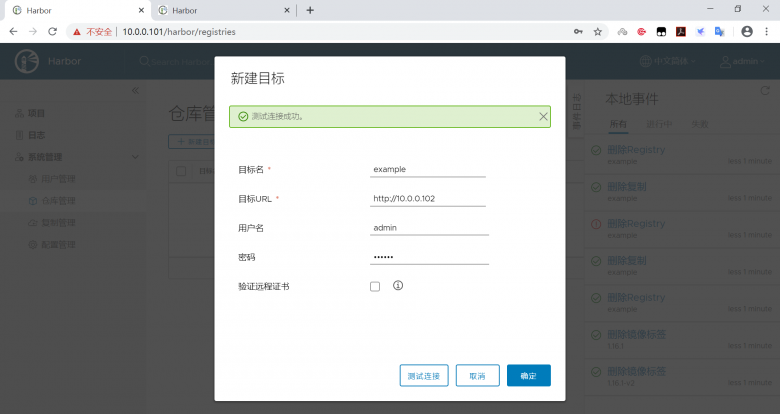
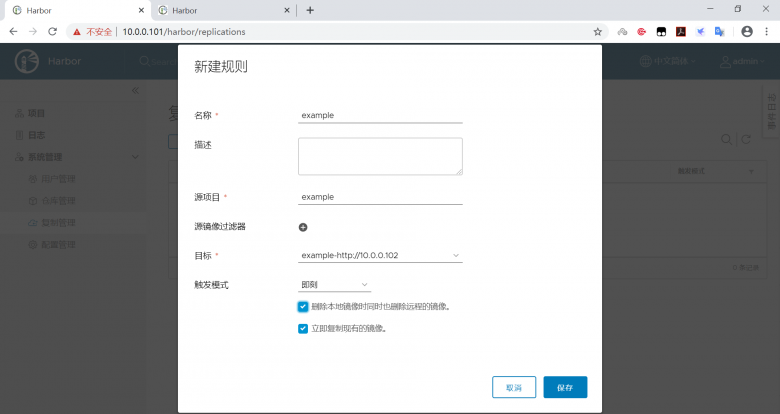
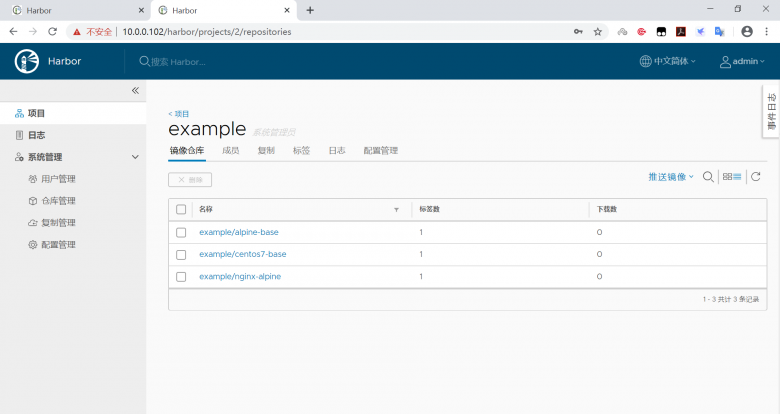
确认同步成功
在第二台harbor主机上可以查看到从第一台主机同步过来的镜像
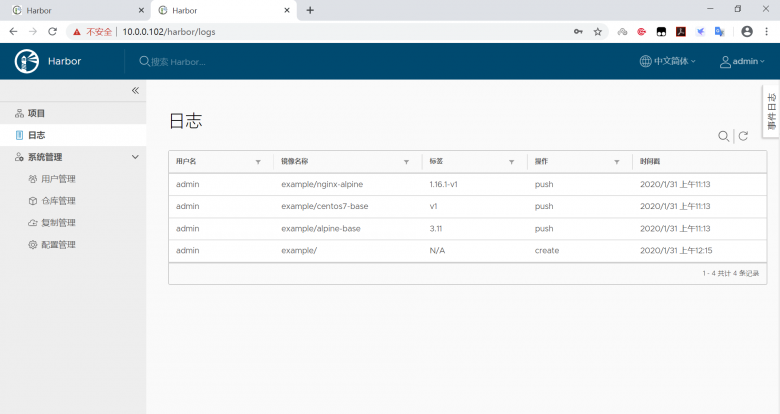
也可以查看到同步日志
上传镜像观察是否可以双高同步
[root@ubuntu1804 ~]#docker tag tomcat-web:app1 10.0.0.101/example/tomcat-web:app1
[root@ubuntu1804 ~]#docker push 10.0.0.101/example/tomcat-web:app1
[root@ubuntu1804 ~]#docker tag tomcat-web:app2 10.0.0.102/example/tomcat-web:app2
[root@ubuntu1804 ~]#docker push 10.0.0.102/example/tomcat-web:app2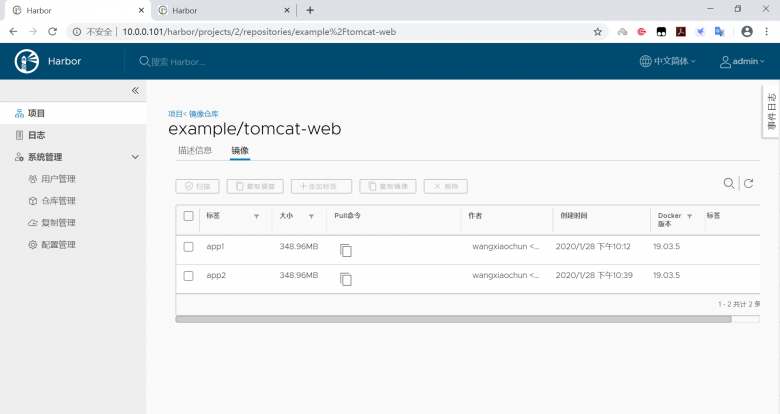

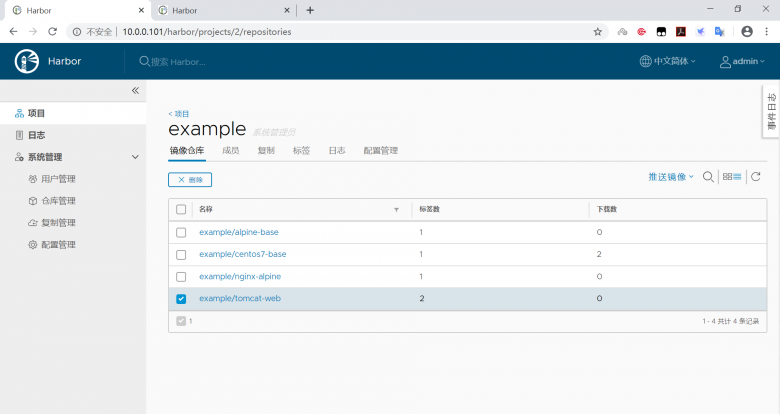
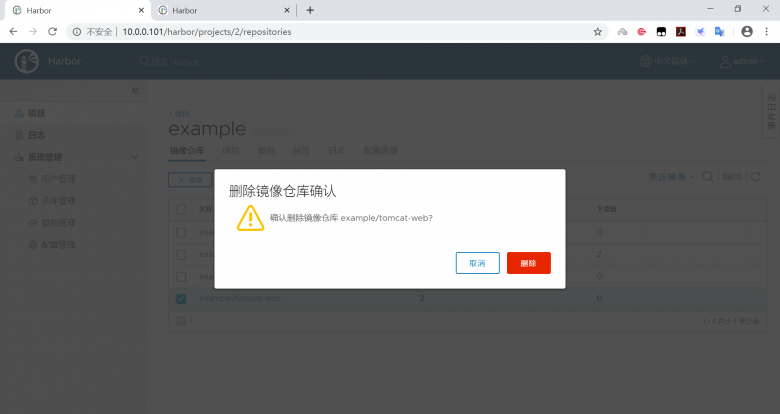
删除镜像观察是否可自动同步
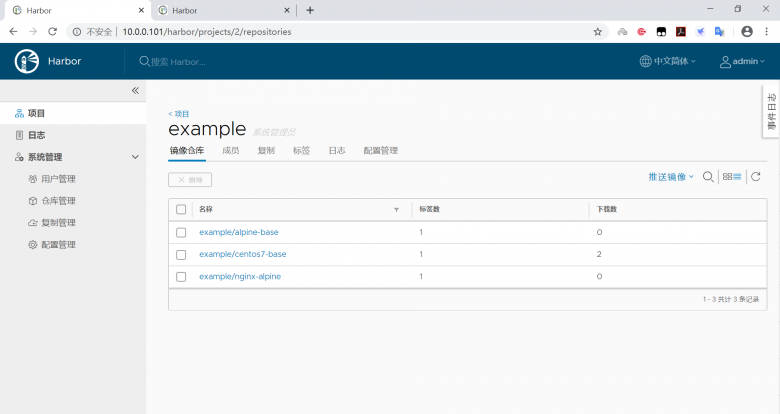
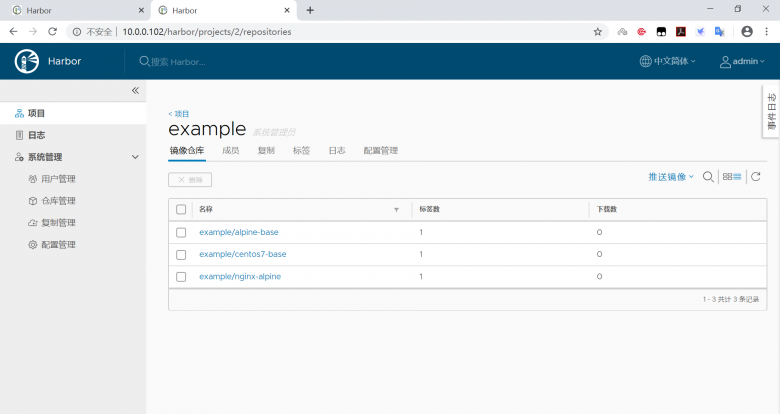
harbor 安全 https配置
harbor默认使用http,为了安全,可以使用https
实现Harbor的https认证
#安装docker
[root@ubuntu1804 ~]#bash install_docker_for_ubuntu1804.sh

#安装docker compose
[root@ubuntu1804 ~]#curl -L https://github.com/docker/compose/releases/download/1.25.3/docker-compose-uname -s-uname -m -o /usr/local/bin/docker-compose
[root@ubuntu1804 ~]#chmod +x /usr/local/bin/docker-compose
[root@ubuntu1804 ~]#docker-compose  --version
docker-compose version 1.25.3, build d4d1b42b

#下载harbor离线安装包且解压缩
[root@ubuntu1804 ~]#wget https://storage.googleapis.com/harbor-releases/release-1.7.0/harbor-offline-installer-v1.7.6.tgz
[root@ubuntu1804 ~]#mkdir /apps
[root@ubuntu1804 ~]#tar xvf harbor-offline-installer-v1.7.6.tgz  -C /apps/

#生成私钥和证书
[root@ubuntu1804 ~]#touch /root/.rnd
[root@ubuntu1804 ~]#mkdir /apps/harbor/certs/
[root@ubuntu1804 ~]#cd /apps/harbor/certs/
[root@ubuntu1804 certs]#openssl req  -newkey rsa:4096 -nodes -sha256 -keyout ca.key -x509  -subj "/CN=ca.magedu.org" -days 365 -out ca.crt
[root@ubuntu1804 certs]#openssl req  -newkey rsa:4096 -nodes -sha256 -subj "/CN=harbor.magedu.org" -keyout harbor.magedu.org.key -out harbor.magedu.org.csr
[root@ubuntu1804 certs]#openssl x509 -req -in harbor.magedu.org.csr -CA ca.crt -CAkey ca.key -CAcreateserial  -out harbor.magedu.org.crt

[root@ubuntu1804 ~]#tree /apps/harbor/certs
/apps/harbor/certs
├── ca.crt
├── ca.key
├── ca.srl
├── harbor.magedu.org.crt
├── harbor.magedu.org.csr
└── harbor.magedu.org.key

0 directories, 6 files
[root@ubuntu1804 ~]#vim /apps/harbor/harbor.cfg
hostname = harbor.magedu.org
ui_url_protocol = https
ssl_cert = /apps/harbor/certs/harbor.magedu.org.crt
ssl_cert_key = /apps/harbor/certs/harbor.magedu.org.key
harbor_admin_password = 123456

[root@ubuntu1804 ~]#apt -y install python
[root@ubuntu1804 ~]#/apps/harbor/install.sh
用https方式访问harbor网站
修改/etc/hosts文件
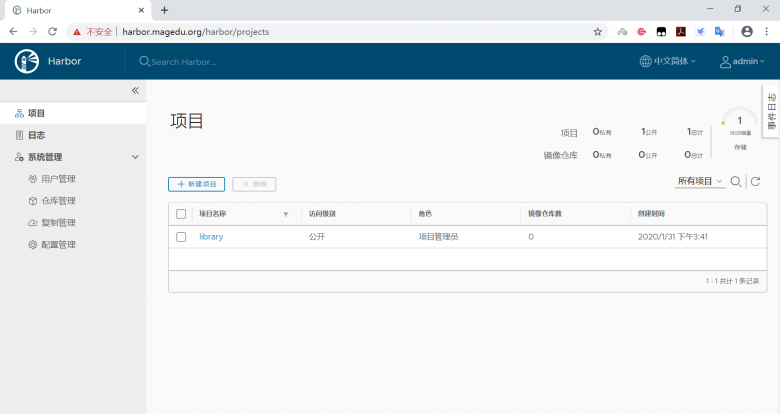
10.0.0.103 harbor.magedu.org打开浏览器,访问http://harbor.magedu.org ,可以看到以下界面
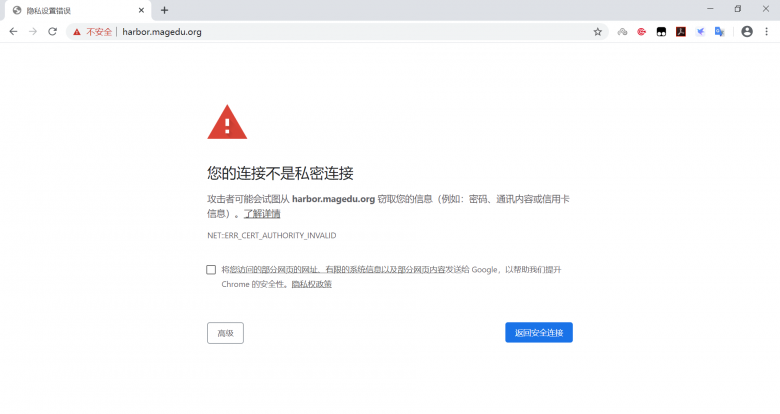
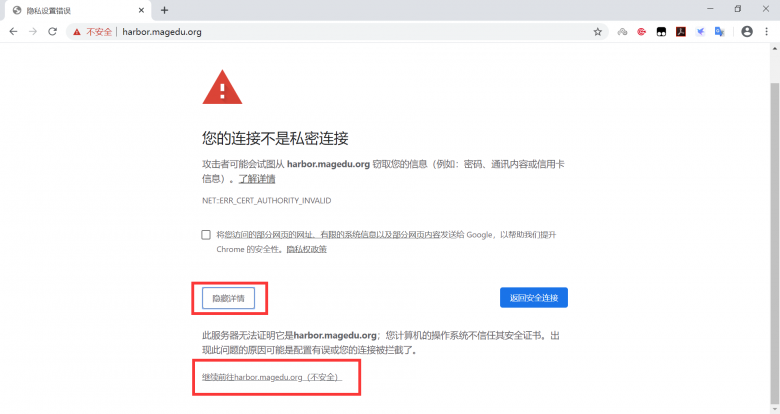

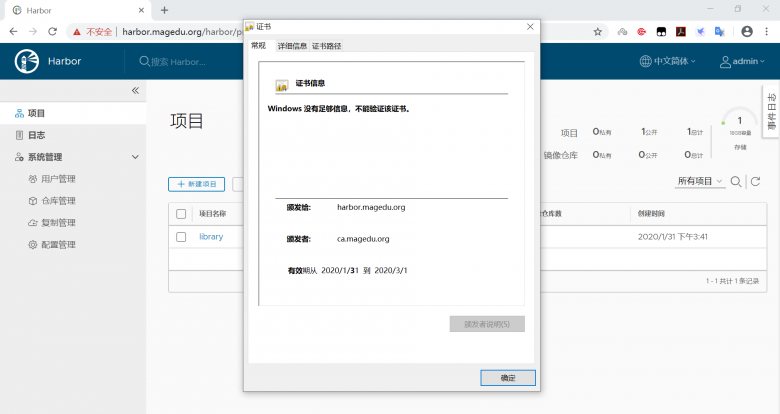
查看证书
上传镜像
先在harbor网站新建项目
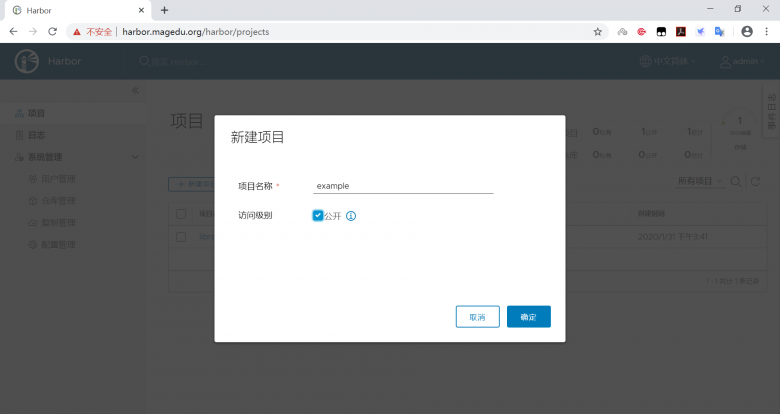
直接上传会报错
[root@ubuntu1804 ~]#vim /etc/hosts
10.0.0.103 harbor.magedu.org

[root@ubuntu1804 ~]#docker login harbor.magedu.org
Username: admin
Password:
Error response from daemon: Get https://harbor.magedu.org/v2/: x509: certificate signed by unknown authority
复制ca的证书
[root@ubuntu1804 ~]#mkdir -pv/etc/docker/certs.d/harbor.magedu.org/
[root@ubuntu1804 ~]#scp -r harbor.magedu.org:/apps/harbor/certs/ca.crt  /etc/docker/certs.d/harbor.magedu.org/
[root@ubuntu1804 ~]#tree /etc/docker/certs.d/
/etc/docker/certs.d/
└── harbor.magedu.org
    └── ca.crt

1 directory, 1 file

[root@ubuntu1804 ~]#docker tag alpine:3.11  harbor.magedu.org/example/alpine:3.11
[root@ubuntu1804 ~]#docker push harbor.magedu.org/example/alpine:3.11
The push refers to repository [harbor.magedu.org/example/alpine]
5216338b40a7: Pushed
3.11: digest: sha256:ddba4d27a7ffc3f86dd6c2f92041af252a1f23a8e742c90e6e1297bfa1bc0c45 size: 528
在harbor网站上验证上传的镜像
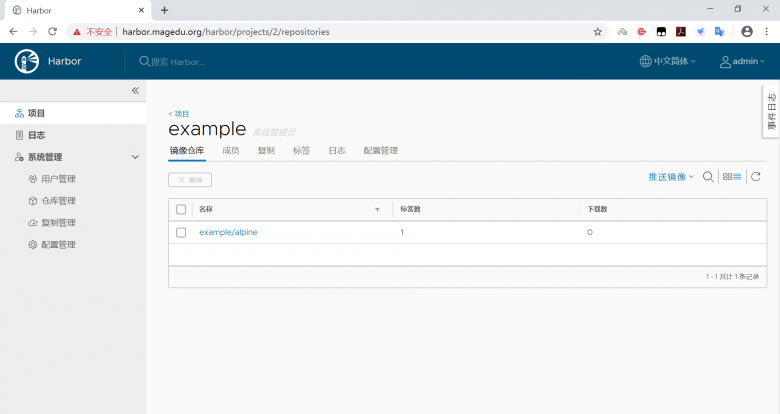
下载镜像
[root@centos7 ~]#vim /etc/hosts
10.0.0.103 harbor.magedu.org
[root@centos7 ~]#docker pull  harbor.magedu.org/example/alpine:3.11
Error response from daemon: Get https://harbor.magedu.org/v2/: x509: certificate signed by unknown authority

[root@centos7 ~]#mkdir -pv/etc/docker/certs.d/harbor.magedu.org/
[root@centos7 ~]#scp -r harbor.magedu.org:/apps/harbor/certs/ca.crt  /etc/docker/certs.d/harbor.magedu.org/
[root@centos7 ~]#tree /etc/docker/certs.d/
/etc/docker/certs.d/
└── harbor.magedu.org
    └── ca.crt

1 directory, 1 file
[root@centos7 ~]#docker images
REPOSITORY          TAG                 IMAGE ID            CREATED             SIZE
[root@centos7 ~]#docker pull  harbor.magedu.org/example/alpine:3.11
3.11: Pulling from example/alpine
c9b1b535fdd9: Pull complete
Digest: sha256:ddba4d27a7ffc3f86dd6c2f92041af252a1f23a8e742c90e6e1297bfa1bc0c45
Status: Downloaded newer image for harbor.magedu.org/example/alpine:3.11
harbor.magedu.org/example/alpine:3.11
[root@centos7 ~]#docker images
REPOSITORY                         TAG                 IMAGE ID            CREATED             SIZE
harbor.magedu.org/example/alpine   3.11                e7d92cdc71fe        13 days ago         5.59MB
本文链接:https://www.yunweipai.com/34933.html


网友评论comments